Showing posts with label Nadie's Kitchen. Show all posts

Friday, 4 March 2016

Comfort Food: Dhal Lemak Telur


There's nothing quite as comforting to me as a bowl of dhal lemak telur. I usually eat it with rice but I could eat it on its own too - the lentils and potatos are warm and filling and the sweet carrots counter the richness of the gravy beautifully. You have egg for a bit of protein too so it's a complete dish!

Unfortunately, there's nothing more perplexing to me than a bowl of dhal lemak telur either.


Tuesday, 27 October 2015

Flourless Pistachio and Calamansi Cake


To say that I'm a bit of a cooking magazine fiend is an understatement. If I were to be completely honest, I'd say that it's a gotten to be a terrible habit. I am always hooked by the pretty cover photo and a few select recipes in the magazine. Said publication ends up in my shopping cart and then I completely forget about it. At present, I have a rather sizeable pile of magazines to go through... that doesn't stop me from scowling at Ant whenever he tries to stop me from buying more from the supermarket.

The thing is though, I have picked up a few gems from these magazines and some recipes have inspired me to tweak and modify them to greatness too. This recipe is based on a recipe that I got out of a Donna Hay magazine. I liked the cake on it's own but I felt like it needed a little something extra - so I decided to marry it with the happy hippy cake recipe by adding the lemon soak to the recipe.
The modification doesn't stop there.


Monday, 6 July 2015

Soy Good

One of the things you will never catch me buying from the supermarket is soy milk. Not because I despise the stuff; on the contrary, I love it. Soy milk conjures memories of weekend mornings in Singapore when dad would go down to the local "town centre" to buy us breakfast and will almost always come back with tau huay (soy bean curd) and tau huay chwee (soy milk). Both were always super hot and super creamy... and both always made me feel super healthy even if the curd was often topped with a layer of sugar syrup.

These soy milk products are such a simple pleasure but it's one I always look for whenever I'm back home. 

Which brings me to why I wouldn't be caught dead picking up soy milk in the supermarket. The stuff they sell in the super market is pure crap. Watered down, almost grey crap which in all honesty, looks pathetic compared to the opaque white nectar you get in Singapore. The only place that I would buy soy milk from is the Asian supermarket - there are two companies in Perth which make the stuff to an acceptable standard.

Unfortunately, the brand I prefer is also notoriously erratic. Firstly, they don't seem to regularly deliver their products to the Asian grocers any more. They used to be in ALL the Asian grocers but now I only know of 2 grocers who stock them. Secondly, the quality (not taste) of the milk seems to be quite suss. There have been times where I've gleefully returned home with my treasure only to find it completely coagulated a couple of days later. So much heart pain. 

Well no more. Now that I have my super swish blender, I've embarked on a mission to make my own soya milk. It's much cheaper than buying it in store. It's also ridiculously easy to make. It does require a bit of prep time though... but I think it's worth it. The hubby seems to think so too. :)  


Soy milk (adapted from Blending with the Boss, the special cookbook which comes with Breville's The Boss blender) 

160g soy beans (soaked for at least 6 hours)
1.2 litres of water (filtered is suggested by the original recipe)
sugar to taste

Method:
  1. Wash the soy beans and throw out any discoloured beans. 
  2. Put half the soy beans into the blender with 600ml of water. Blend until the beans are broken down to fine particles. 
  3. Pour the mix into a muslin lined strainer over a pot, squeeze as much liquid as you can out of the muslin. 
  4. Repeat 2 and 3
  5. Put the pot on the stove and bring the mix to a slow boil while stirring the mixture. Skim off any foam or skin that forms at the top in the process. 
  6. Once the milk starts to boil, let it boil gently for about 10 - 15 minutes. Add sugar/sweetener to taste and keep stirring. 
  7. Once you are satisfied with the taste of the milk, turn off the heat and transfer the milk immediately to another pot/container/jug with a wide opening. 
  8. Let the mix cool off the stove, skimming any skin that might form in the meantime.
  9. Once completely cool, transfer the soy milk into a bottle/sealed jug and keep in the fridge. 

Notes
  • Depending on the size of your blender, you might have to split the processing into batches. The original recipe suggested to do it in two batches. The Boss has quite a generous pitcher so if you have a more modestly sized blender, you might have to do it over 3-4 batches. 
  • You can get nut milk bags from eBay. I used muslin because it's all I had on me. Just be careful with using muslin because it's easy to get distracted and suddenly fine soy bean paste squelching out of the top of your cloth because you didn't seal it properly. 
  • Step 6 wasn't part of the additional recipe - I added it because I suspected that my soy milk was getting too overheated from the residual heat of the pot and stove. My first attempt at soy milk was a bit too thick for my liking which I suspect was because of this. My second attempt worked much better. 
  • I used a pyrex measuring jug in Step 6. It's perfect because it's large enough to hold a batch of soy milk and it's easy to transfer the milk to a bottle for storage. 

Monday, 25 May 2015

Iced Gems

As a kid, one of my FAVOURITE shops to go to is what I called the "100grams shop".

It's a shop which sells all manner of snacks and sweets by weight. The shop would be packed full of metal, airtight containers to keep the biscuits fresh and they'd also have plastic bins filled with preserved fruit and lollies. (And now we know why I was a tubby child)


Tuesday, 6 January 2015

Gudir for Goondus

It's 2015!

I'm in a bit of disbelief because it's no longer "we're visiting Japan next year" but "we're visiting Japan this year!". I feel like I've been planning the epic journey for way too long, I just want to go already!

Part of our trip to Japan includes stopovers in Singapore. Now, as any self-respecting Singaporean will attest, a stopover in Singapore means eating lots of local food. Additionally, if you're a (ugh) foodie like me, it also means stocking up on ingredients/tools to bring back home to Perth so that one can recreate Singaporean delights in one's Ozzie kitchen.

I've already warned the hubby that I'll be making a pit stop into lots of local bakeries (I must admit, I haven't even used some of the cool tools I bought on my last trip!) to buy a few more toys.

On the list is pretty jelly moulds like my fantail goldfish mould below, which I bought from a random supermarket in Sandakan, Sabah. I've got a few merlion moulds hiding in the house somewhere and I'm hoping I'll get more unique moulds while I am in Singapore.


Sunday, 14 December 2014

Gettin' Cheesy

I've been on a bit of a cheesecake kick at the moment. 


Okay that's a bit inaccurate because it's not that I can't stop eating cheesecake. I just keep wanting to make them because I'm itching to perfect the recipe that I found.

Friday, 14 November 2014

Mah Cherry Pie

It really amuses me when people tell me that I have an American accent. Not because I've always considered my accent to be a bit of a chameleon mongrel (my sister thinks I have an Australian accent whenever I'm back in Singapore) but because I think it's funny that I do when Singapore is more known for being a former British colony.

That said, while there were lots of English influences when I was growing up (Allo Allo, The Brittas Empire and Mind Your Language anyone?), there was more of a Yankee invasion towards my teens. The proliferation of American culture is evident - even our DJs speak with American accents.

That said, in spite of this, I've never had one of the most American desserts... cherry pie... until I came to Perth!

Tuesday, 28 October 2014

Cheater's Layang Layang

"Let's go fly a kite
Up to the highest height!
Let's go fly a kite and send it soaring
Up through the atmosphere
Up where the air is clear
Let's go fly a kite!"


This is the song I always think of whenever you mention layang-layang (Malay for kite) to me. I really don't understand why these little nibblies are called layang-layang. They look NOTHING like kites to me.

What I do know is that they're devilishly crunchy and sweet narcotics. You have one and five seconds later, half a container is gone.

In the old days, people used to make these from scratch (and trust me, I will be trying this and sharing this recipe soon. It's on my list). In the last 10-15 years or so though, people have found spring roll skins to be the perfect alternative to making these snacks. Texturally, it's a little bit different (the original layang layang are similar to Italian crostoli, only more "layered" looking and less blistered) but it's still wonderfully irresistable. 

Saturday, 4 October 2014

Nasi Minyak

Nasi minyak.

Say those two words to any single Malay/Indian-Muslim and you're likely to get a cringe and semi-nervous laugh if you're lucky... and a slap across the face if you're not.

Now, what exactly is it about nasi minyak (or ghee rice) that can raise such ire? How can such a delicately spiced, luxuriantly buttery dish ignite such negative feelings?

Monday, 11 August 2014

Who's the Happy Hippie?

I have a friend who used to lived in Perth and she was absolutely fabulous at baking. Not only was she technically adept at the art but she was just so bake-happy. I love baking but laziness (argh, cleaning my KitchenAid) often puts me off spending time being a domestic goddess.

Anyway, she and her (then) partner, being from Switzerland, had a deep appreciation for all things sweet. I think they are the only people who smuggle more food back into Perth than I do - although their booty primarily comprised chocolate!

These two facts meant that most visits to her place would end up involving a cheeky piece of Swiss chocolate (I blame them for introducing me to Camille Bloch chocolate... omg) or a fresly baked cake.

My favourite offering though, was her Soaked Lemon Cake. It was so moist and lemony (without being sour) and... happy. I don't know what it was, but there was something about that cake that was all sunshine and rainbows and it would just perk me up instantly. Hence, we named the cake the Happy Lemon cake... and so began the tradition of her randomly bringing slices of lemony lusciousness whenever we met up at dance socials.

I was lucky enough to score the recipe off her so that I can now make it myself. I do, however, do it with a slight twist.

I can't remember how exactly it happened but I think it started when I felt like making a marble cake. I felt like being artistic but I couldn't be arsed to make a marble cake because the tried and tested recipe I have for marble cake involves more eggs than I had at the time. Plus, I was probably (not so secretly) hankering for the flavours of Happy Lemon Cake.

So I compromised - I made a Happy Lemon cake but decided to divide and colour a few portions so that I could play with the marbling effect. Of course, me being me, I couldn't stop at just two colours for my cake - in went pink, blue, yellow and orange.


When I cut into the cake, I was confronted by a mish mash of colours. How psychedelic, I thought.


And so the Happy Hippie Lemon Cake was born.

And I dare you to NOT feel happy when you see and eat this cake :)

Happy Hippie Lemon Cake

250g unsalted butter
250g sugar
250g plain flour
4 eggs
zest of 2 lemons
pinch of salt
1 teaspoon baking powder
200ml lemon juice
200g icing sugar/icing sugar mix

Method: 
  1. Beat the butter and sugar until soft, pale and creamy
  2. Add the eggs and beat until the mixture is foamy 
  3. Add the lemon zest, flour, salt and baking powder. Mix well. 
  4. Divide the batter into as many portions as you want (depending on how many colours you decide to use) and colour them as desired. 
  5. Spread alternating batches of batter on to each other. Ideally, you want multiple "bullseyes" in your pan. 
  6. Once you've used all your batter, take a skewer (or butter knife) and run it in parallel lines across your pan. That said, you also want to alternate the direction you run the skewer. So if your first line goes from left to right, you want the second line to go from right to left... and so on. 
  7. Bake for approximately 45 minutes at 180 degrees (non-fan forced oven)
  8. While the cake is baking, make a lemon syrup by combining the lemon juice and icing sugar. 
  9. Once the cake is baked and cooled, douse the cake with the lemon juice syrup and leave it to soak in the pan (*see extra notes).
  10. Carefully unmould the cake, slice it and serve!   
Extra notes:
  • I would STRONGLY recommend using a silicon baking pan for this cake. The cake (depending on how soaked it is) can be quite tricky to remove. Alternatively, you may want to use a springform pan (I've not used one for this recipe before but it might work as well as a silicon mould). 
  • You can probably unmould the cake first before soaking it but I prefer soaking it while it's in the pan so that the syrup stays in the mould instead of seeping out onto a serving plate. Why waste all that lovely syrup on the plate when it can be packed into your cake?
  • When dousing the cake, I prefer doing it in batches, to let the syrup seep into it slowly. I find that submerging the cake in syrup tends to leave it with a very brittle and mushy surface. 
  • When dousing in batches, always pour the syrup to the centre of the cake - the edges of the cake tend to absorb the most liquid because most of the excess syrup will flow to the sides.
  • You can douse it all in one go - which makes the coverage more even but like I said in my previous bullet points, I prefer not to risk having the mushy top layer. It's all about personal preferences :)
  • This cake is best made in advance - I like to do it the night before. 
  • Be very careful when spreading the layers - the batter is quite thick and won't spread as easily. You might find it easier to pat each layer down gently as opposed to spreading the batter.

Tuesday, 29 July 2014

Cashew Nut Cookies

When most people think of cashew nut cookies... this is what they have in mind:


It looks pretty harmless, right? I mean, it's just a randomly shaped biscuit with a cashew nut and a healthy glaze of egg.

Well. When I was younger, cashew nut cookies were the enemy. Partly because mum put cloves in hers (which I almost always bit into) but namely because they were a pain in the ass to make. Why were they a pain in the ass to make?

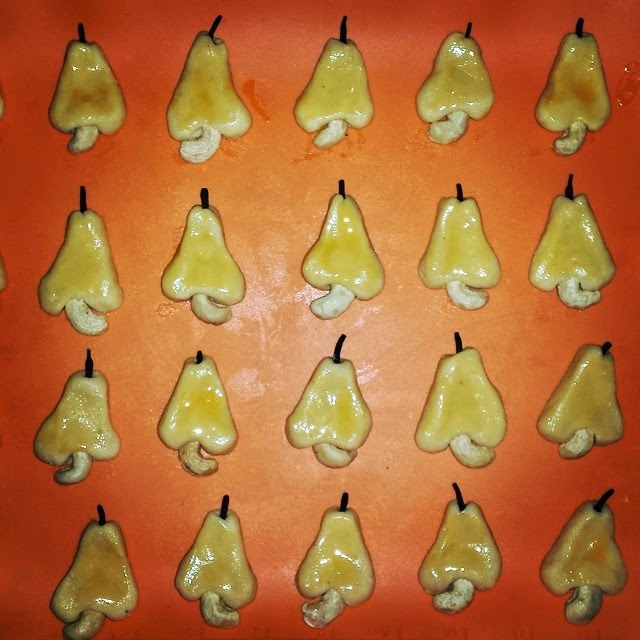
Because THIS is how mum shapes her cashew nut biscuits:


And why were they shaped like this?? To mimic cashew fruits, of course...


Sigh.

To give you a rough idea of how long it takes to shape the cookies, this tray you see below (partly cropped, I got 28 cookies per tray, I think) took me at least TWENTY MINUTES to shape. Just shape. Glaze not included.


There are so many things to bear in mind while making these cookies.
  • Cashew nut size - you want to use bigger pieces so that there's enough of it anchored in the cookie so that it won't fall out but at the same time, you want at least half of the nut sticking out for aesthetic purposes. 
  • On that note, this means you have to be extra careful when splitting your cashew nuts. I can't tell you the number of halves I've had to relegate to the cashew meal pile.
  • Cookie proportion - you need the top of the cookie to be noticeably narrower from the bottom so that when the cookie expands in the oven, you stil have a pear shape. 
  • While the cashew fruit has a round bottom, I prefer the W shaped bottom, the way my mum does it. It just looks nicer than having a wonky looking triangle after baking. As you'll see in my top photo, that cookie is a bit of a fail in this respect - the bottom bit is looking quite rounded because I didn't make the W pronounced enough. 
  • Cookie thickness - you want the cookies to be fairly thick at the bottom so that the cashew nut will stay in place when you pick the cookie up. 
It really is a pain in the ass... but I've grown to love these cookies. I even eat the cloves sometimes! I really cannot bring myself to shape this cookie any other way... so I am doomed to spend way too much time baking these yummy treats.

Cashew Nut Cookies

230g butter
150g caster sugar
360g flour
150g cashew nuts, ground to a fine meal
1 tsp vanilla
1 egg yolk
Extra egg yolks, for glazing
Cashew nuts, halved
Cloves

Method:
  1. Preheat the oven at 160 degrees.
  2. Cream butter and sugar until smooth.
  3. Add flour and ground cashew nuts. Mix until well incorporated.
  4. Stir in egg yolk and vanilla.
  5. Shape the  cookie (suggestions on how to do this in the notes section)
  6. Insert a cashew nut at the bottom and a clove at the top of the cookie, making sure that they are well-enclosed in the batter.
  7. Glaze the completed cookies with egg yolk.
  8. Bake for approx 20 mins. 
Extra notes: 
  • Work quickly, using your fingers to shape the cookies.
  • One strategy I use is to take some batter, roll it in a ball then mould it, using my finger as a guide. From there, I make one end wider than the other so that it goes from looking rectangular to pear-shaped.
  •  Another way I shape the cookies to form a tear drop/rounded triangle shape.
  • I put a little dent in the middle of the bottom (wide end), where the cashew nut will go. The batter will mould around the cashew half, giving you a w-shape. 
  • In any case, make sure that your cookies are fairly "tall" as they will expand on cooking. Making your cookies long will ensure that you don't get blobby cookies.
  • Also, you'll need to make sure that the top of the cookie is significantly narrow-er than the bottom so that you maintain a pear shape when the cookie is baked.
  • For a bit of artistic flair, I also sometimes slant my cookies so that it looks a little lopsided. Just like how fruits in real life aren't always perfect looking ;)

Monday, 28 July 2014

Eid-sy Peasy Lodeh

I'll admit it: while Hari Raya is a celebration to mark the end the holy month of Ramadan... one of the most highly-anticipated parts of the first day, for me... is FOOD. Are we surprised?

While I am a sweet tooth, and as such, my main priority for my Hari Raya binge eating is pineapple tarts... Eid simply isn't the same without my mom's lodeh.

Lodeh is a mild, coconut-based, vegetable-laden thin curry - it would almost be a vegan's delight if not for the use of shrimp paste. It's meant to be a mild curry because you often eat it with a side serve of spicy, heady rendang/prawn sambal/sambal goreng - by the time you're halfway through the meal, the gravy from these curries will seep into the coconut curry and flavour your lodeh. Additionally, most people eat lodeh with serunding - a spicy coconut floss. So you definitely want a mild lodeh gravy to complement the meal. 

That said, I LOVE lodeh. I am quite happy to drown my ketupat/lontong in lodeh and heap lots of veggies on my plate. In fact, I would happily eat this like a soup without rice, without accompaniments. I'd like to think that this is one of the rare ways I'm quite Malay - I am an absolute sucker for coconut milk based curries.

Mom's lodeh is significantly different from other lodehs - she calls her lodeh, Lodeh Kuah Putih, or White Lodeh. You see, most people add tumeric to their lodeh, which gives it a lovely yellowy hue. To be honest though, tumeric-tinged hue just isn't festive to me because it'll make your meal look like a bowl of lontong - which you can get for breakfast any day of the week. I know it's just a minor difference but I like my lodeh to be a bit special than normal lontong gravy. Heh!

Anyhoo, this is a super easy recipe. In terms of prep work, it's relatively simple in that you don't need to chop and blend a spice paste. Simply prep your veg and you're on your way. I was pretty stoked by how well my first batch of lodeh went.

Sorry, I don't have a photo of the batch I made. I was too hungry and only remembered to take a photo AFTER I'd gotten a second serve.


Lodeh Kuah Putih/ White Lodeh (A Work in Progress Recipe)

1 large spanish onion, sliced.
1 large green chilli, sliced at a diagonal
2 cloves of garlic, crushed
2 inches galangal, sliced and slightly crushed
2 stalks of lemongrass, tops cut off and bulbs crushed
2 Bay leaves
1 heaped tablespoons of pink belacan or fine shrimp paste (amount to be verified)
2 tablespoons of finely crushed dried prawns (amount to be verified)
1 can of coconut milk (amount to be verified)
Approx equivalent amount of water
Salt to taste (I didn't use any tho!)
1kg of your choice of "filling"

Filling options: 
  • Cabbage, sliced
  • Yam beans/bangkwang, peeled or cut into strips
  • Bamboo shoots, cut into strips or squares
  • Carrots, sliced at a diagonal
  • Snake/long beans, cut
  • Young nangka segments
  • Potato, cut into chunks 
  • Firm tofu, cut into squares or triangles and fried
  • Tempeh, cut into thick chunks and fried
Method
  1. Stir fry your onion, green chilli and garlic until soft. 
  2. Lower the heat and add water and coconut milk.
  3. Add your lemongrass, galangal, shrimp paste and crushed prawns. 
  4. Add your fillings and boil until tender.
Notes
  •  If you're in Singapore, you might want to use 2 onions - the onion I used was pretty huge. You essentially want about 1 and half to 2 cups worth of sliced onions.
  • You may also substitute onions with shallots.
  • I FORGOT the bay leaves when I first made this... and it still tasted pretty spot on.
  • Depending on what you choose as your filling, you might have to add each element at different stages of the cooking process so that you don't overcook/undercook anything.
  • Some recipes suggest using dried prawns and pounding in a mortar and pestle. However, I use powder fine, crushed dried prawns from my Asian supermarket. It just saves me the hassle of lugging out my giant mortar and pestle. It also incorporates itself into the gravy much easier. 
  • It is IMPERATIVE that you use pink belacan or shrimp paste instead of the usual dark belacan - using the latter will give you a very dark lodeh... which defeats the purpose! lol