Showing posts with label recipes. Show all posts

Tuesday, 27 October 2015

Flourless Pistachio and Calamansi Cake


To say that I'm a bit of a cooking magazine fiend is an understatement. If I were to be completely honest, I'd say that it's a gotten to be a terrible habit. I am always hooked by the pretty cover photo and a few select recipes in the magazine. Said publication ends up in my shopping cart and then I completely forget about it. At present, I have a rather sizeable pile of magazines to go through... that doesn't stop me from scowling at Ant whenever he tries to stop me from buying more from the supermarket.

The thing is though, I have picked up a few gems from these magazines and some recipes have inspired me to tweak and modify them to greatness too. This recipe is based on a recipe that I got out of a Donna Hay magazine. I liked the cake on it's own but I felt like it needed a little something extra - so I decided to marry it with the happy hippy cake recipe by adding the lemon soak to the recipe.
The modification doesn't stop there.


Monday, 6 July 2015

Soy Good

One of the things you will never catch me buying from the supermarket is soy milk. Not because I despise the stuff; on the contrary, I love it. Soy milk conjures memories of weekend mornings in Singapore when dad would go down to the local "town centre" to buy us breakfast and will almost always come back with tau huay (soy bean curd) and tau huay chwee (soy milk). Both were always super hot and super creamy... and both always made me feel super healthy even if the curd was often topped with a layer of sugar syrup.

These soy milk products are such a simple pleasure but it's one I always look for whenever I'm back home. 

Which brings me to why I wouldn't be caught dead picking up soy milk in the supermarket. The stuff they sell in the super market is pure crap. Watered down, almost grey crap which in all honesty, looks pathetic compared to the opaque white nectar you get in Singapore. The only place that I would buy soy milk from is the Asian supermarket - there are two companies in Perth which make the stuff to an acceptable standard.

Unfortunately, the brand I prefer is also notoriously erratic. Firstly, they don't seem to regularly deliver their products to the Asian grocers any more. They used to be in ALL the Asian grocers but now I only know of 2 grocers who stock them. Secondly, the quality (not taste) of the milk seems to be quite suss. There have been times where I've gleefully returned home with my treasure only to find it completely coagulated a couple of days later. So much heart pain. 

Well no more. Now that I have my super swish blender, I've embarked on a mission to make my own soya milk. It's much cheaper than buying it in store. It's also ridiculously easy to make. It does require a bit of prep time though... but I think it's worth it. The hubby seems to think so too. :)  


Soy milk (adapted from Blending with the Boss, the special cookbook which comes with Breville's The Boss blender) 

160g soy beans (soaked for at least 6 hours)
1.2 litres of water (filtered is suggested by the original recipe)
sugar to taste

Method:
  1. Wash the soy beans and throw out any discoloured beans. 
  2. Put half the soy beans into the blender with 600ml of water. Blend until the beans are broken down to fine particles. 
  3. Pour the mix into a muslin lined strainer over a pot, squeeze as much liquid as you can out of the muslin. 
  4. Repeat 2 and 3
  5. Put the pot on the stove and bring the mix to a slow boil while stirring the mixture. Skim off any foam or skin that forms at the top in the process. 
  6. Once the milk starts to boil, let it boil gently for about 10 - 15 minutes. Add sugar/sweetener to taste and keep stirring. 
  7. Once you are satisfied with the taste of the milk, turn off the heat and transfer the milk immediately to another pot/container/jug with a wide opening. 
  8. Let the mix cool off the stove, skimming any skin that might form in the meantime.
  9. Once completely cool, transfer the soy milk into a bottle/sealed jug and keep in the fridge. 

Notes
  • Depending on the size of your blender, you might have to split the processing into batches. The original recipe suggested to do it in two batches. The Boss has quite a generous pitcher so if you have a more modestly sized blender, you might have to do it over 3-4 batches. 
  • You can get nut milk bags from eBay. I used muslin because it's all I had on me. Just be careful with using muslin because it's easy to get distracted and suddenly fine soy bean paste squelching out of the top of your cloth because you didn't seal it properly. 
  • Step 6 wasn't part of the additional recipe - I added it because I suspected that my soy milk was getting too overheated from the residual heat of the pot and stove. My first attempt at soy milk was a bit too thick for my liking which I suspect was because of this. My second attempt worked much better. 
  • I used a pyrex measuring jug in Step 6. It's perfect because it's large enough to hold a batch of soy milk and it's easy to transfer the milk to a bottle for storage. 

Monday, 25 May 2015

Iced Gems

As a kid, one of my FAVOURITE shops to go to is what I called the "100grams shop".

It's a shop which sells all manner of snacks and sweets by weight. The shop would be packed full of metal, airtight containers to keep the biscuits fresh and they'd also have plastic bins filled with preserved fruit and lollies. (And now we know why I was a tubby child)


Tuesday, 28 October 2014

Cheater's Layang Layang

"Let's go fly a kite
Up to the highest height!
Let's go fly a kite and send it soaring
Up through the atmosphere
Up where the air is clear
Let's go fly a kite!"


This is the song I always think of whenever you mention layang-layang (Malay for kite) to me. I really don't understand why these little nibblies are called layang-layang. They look NOTHING like kites to me.

What I do know is that they're devilishly crunchy and sweet narcotics. You have one and five seconds later, half a container is gone.

In the old days, people used to make these from scratch (and trust me, I will be trying this and sharing this recipe soon. It's on my list). In the last 10-15 years or so though, people have found spring roll skins to be the perfect alternative to making these snacks. Texturally, it's a little bit different (the original layang layang are similar to Italian crostoli, only more "layered" looking and less blistered) but it's still wonderfully irresistable. 

Saturday, 4 October 2014

Nasi Minyak

Nasi minyak.

Say those two words to any single Malay/Indian-Muslim and you're likely to get a cringe and semi-nervous laugh if you're lucky... and a slap across the face if you're not.

Now, what exactly is it about nasi minyak (or ghee rice) that can raise such ire? How can such a delicately spiced, luxuriantly buttery dish ignite such negative feelings?

Thursday, 11 September 2014

Almond London

So our Eid open house has come and gone... and surprise, surprise, I have a surplus of cake and cookies around me. Believe it or not, I wanted to make more but I made so much that the hubby revoked my oven access. I tried to get around it by suggesting I make agar-agar (jellies) instead but I was banned from sweet-making of any kind. BOO. 

So despite my apparent makcik-inclination to think that there is never enough food, I am actually quite proud that I managed to bake everything that I did. I made a few family traditions and some noveau-traditional cookies too.

Noveau-traditional?

Monday, 11 August 2014

Who's the Happy Hippie?

I have a friend who used to lived in Perth and she was absolutely fabulous at baking. Not only was she technically adept at the art but she was just so bake-happy. I love baking but laziness (argh, cleaning my KitchenAid) often puts me off spending time being a domestic goddess.

Anyway, she and her (then) partner, being from Switzerland, had a deep appreciation for all things sweet. I think they are the only people who smuggle more food back into Perth than I do - although their booty primarily comprised chocolate!

These two facts meant that most visits to her place would end up involving a cheeky piece of Swiss chocolate (I blame them for introducing me to Camille Bloch chocolate... omg) or a fresly baked cake.

My favourite offering though, was her Soaked Lemon Cake. It was so moist and lemony (without being sour) and... happy. I don't know what it was, but there was something about that cake that was all sunshine and rainbows and it would just perk me up instantly. Hence, we named the cake the Happy Lemon cake... and so began the tradition of her randomly bringing slices of lemony lusciousness whenever we met up at dance socials.

I was lucky enough to score the recipe off her so that I can now make it myself. I do, however, do it with a slight twist.

I can't remember how exactly it happened but I think it started when I felt like making a marble cake. I felt like being artistic but I couldn't be arsed to make a marble cake because the tried and tested recipe I have for marble cake involves more eggs than I had at the time. Plus, I was probably (not so secretly) hankering for the flavours of Happy Lemon Cake.

So I compromised - I made a Happy Lemon cake but decided to divide and colour a few portions so that I could play with the marbling effect. Of course, me being me, I couldn't stop at just two colours for my cake - in went pink, blue, yellow and orange.


When I cut into the cake, I was confronted by a mish mash of colours. How psychedelic, I thought.


And so the Happy Hippie Lemon Cake was born.

And I dare you to NOT feel happy when you see and eat this cake :)

Happy Hippie Lemon Cake

250g unsalted butter
250g sugar
250g plain flour
4 eggs
zest of 2 lemons
pinch of salt
1 teaspoon baking powder
200ml lemon juice
200g icing sugar/icing sugar mix

Method: 
  1. Beat the butter and sugar until soft, pale and creamy
  2. Add the eggs and beat until the mixture is foamy 
  3. Add the lemon zest, flour, salt and baking powder. Mix well. 
  4. Divide the batter into as many portions as you want (depending on how many colours you decide to use) and colour them as desired. 
  5. Spread alternating batches of batter on to each other. Ideally, you want multiple "bullseyes" in your pan. 
  6. Once you've used all your batter, take a skewer (or butter knife) and run it in parallel lines across your pan. That said, you also want to alternate the direction you run the skewer. So if your first line goes from left to right, you want the second line to go from right to left... and so on. 
  7. Bake for approximately 45 minutes at 180 degrees (non-fan forced oven)
  8. While the cake is baking, make a lemon syrup by combining the lemon juice and icing sugar. 
  9. Once the cake is baked and cooled, douse the cake with the lemon juice syrup and leave it to soak in the pan (*see extra notes).
  10. Carefully unmould the cake, slice it and serve!   
Extra notes:
  • I would STRONGLY recommend using a silicon baking pan for this cake. The cake (depending on how soaked it is) can be quite tricky to remove. Alternatively, you may want to use a springform pan (I've not used one for this recipe before but it might work as well as a silicon mould). 
  • You can probably unmould the cake first before soaking it but I prefer soaking it while it's in the pan so that the syrup stays in the mould instead of seeping out onto a serving plate. Why waste all that lovely syrup on the plate when it can be packed into your cake?
  • When dousing the cake, I prefer doing it in batches, to let the syrup seep into it slowly. I find that submerging the cake in syrup tends to leave it with a very brittle and mushy surface. 
  • When dousing in batches, always pour the syrup to the centre of the cake - the edges of the cake tend to absorb the most liquid because most of the excess syrup will flow to the sides.
  • You can douse it all in one go - which makes the coverage more even but like I said in my previous bullet points, I prefer not to risk having the mushy top layer. It's all about personal preferences :)
  • This cake is best made in advance - I like to do it the night before. 
  • Be very careful when spreading the layers - the batter is quite thick and won't spread as easily. You might find it easier to pat each layer down gently as opposed to spreading the batter.

Tuesday, 29 July 2014

Cashew Nut Cookies

When most people think of cashew nut cookies... this is what they have in mind:


It looks pretty harmless, right? I mean, it's just a randomly shaped biscuit with a cashew nut and a healthy glaze of egg.

Well. When I was younger, cashew nut cookies were the enemy. Partly because mum put cloves in hers (which I almost always bit into) but namely because they were a pain in the ass to make. Why were they a pain in the ass to make?

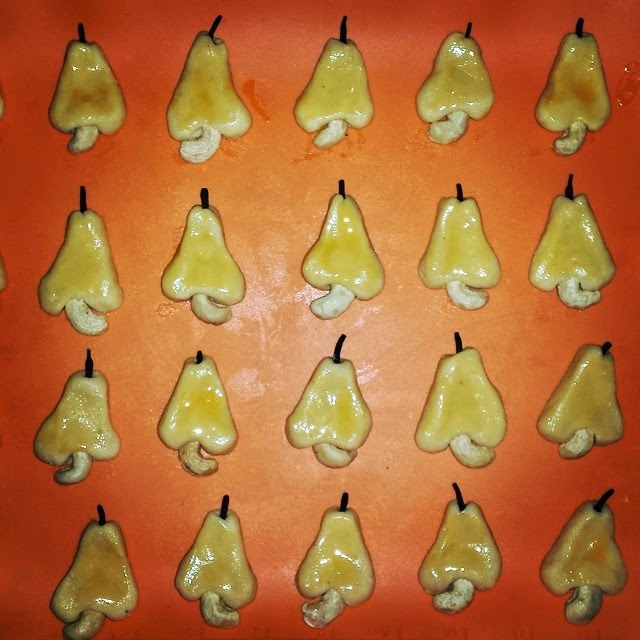
Because THIS is how mum shapes her cashew nut biscuits:


And why were they shaped like this?? To mimic cashew fruits, of course...


Sigh.

To give you a rough idea of how long it takes to shape the cookies, this tray you see below (partly cropped, I got 28 cookies per tray, I think) took me at least TWENTY MINUTES to shape. Just shape. Glaze not included.


There are so many things to bear in mind while making these cookies.
  • Cashew nut size - you want to use bigger pieces so that there's enough of it anchored in the cookie so that it won't fall out but at the same time, you want at least half of the nut sticking out for aesthetic purposes. 
  • On that note, this means you have to be extra careful when splitting your cashew nuts. I can't tell you the number of halves I've had to relegate to the cashew meal pile.
  • Cookie proportion - you need the top of the cookie to be noticeably narrower from the bottom so that when the cookie expands in the oven, you stil have a pear shape. 
  • While the cashew fruit has a round bottom, I prefer the W shaped bottom, the way my mum does it. It just looks nicer than having a wonky looking triangle after baking. As you'll see in my top photo, that cookie is a bit of a fail in this respect - the bottom bit is looking quite rounded because I didn't make the W pronounced enough. 
  • Cookie thickness - you want the cookies to be fairly thick at the bottom so that the cashew nut will stay in place when you pick the cookie up. 
It really is a pain in the ass... but I've grown to love these cookies. I even eat the cloves sometimes! I really cannot bring myself to shape this cookie any other way... so I am doomed to spend way too much time baking these yummy treats.

Cashew Nut Cookies

230g butter
150g caster sugar
360g flour
150g cashew nuts, ground to a fine meal
1 tsp vanilla
1 egg yolk
Extra egg yolks, for glazing
Cashew nuts, halved
Cloves

Method:
  1. Preheat the oven at 160 degrees.
  2. Cream butter and sugar until smooth.
  3. Add flour and ground cashew nuts. Mix until well incorporated.
  4. Stir in egg yolk and vanilla.
  5. Shape the  cookie (suggestions on how to do this in the notes section)
  6. Insert a cashew nut at the bottom and a clove at the top of the cookie, making sure that they are well-enclosed in the batter.
  7. Glaze the completed cookies with egg yolk.
  8. Bake for approx 20 mins. 
Extra notes: 
  • Work quickly, using your fingers to shape the cookies.
  • One strategy I use is to take some batter, roll it in a ball then mould it, using my finger as a guide. From there, I make one end wider than the other so that it goes from looking rectangular to pear-shaped.
  •  Another way I shape the cookies to form a tear drop/rounded triangle shape.
  • I put a little dent in the middle of the bottom (wide end), where the cashew nut will go. The batter will mould around the cashew half, giving you a w-shape. 
  • In any case, make sure that your cookies are fairly "tall" as they will expand on cooking. Making your cookies long will ensure that you don't get blobby cookies.
  • Also, you'll need to make sure that the top of the cookie is significantly narrow-er than the bottom so that you maintain a pear shape when the cookie is baked.
  • For a bit of artistic flair, I also sometimes slant my cookies so that it looks a little lopsided. Just like how fruits in real life aren't always perfect looking ;)

Monday, 28 July 2014

Eid-sy Peasy Lodeh

I'll admit it: while Hari Raya is a celebration to mark the end the holy month of Ramadan... one of the most highly-anticipated parts of the first day, for me... is FOOD. Are we surprised?

While I am a sweet tooth, and as such, my main priority for my Hari Raya binge eating is pineapple tarts... Eid simply isn't the same without my mom's lodeh.

Lodeh is a mild, coconut-based, vegetable-laden thin curry - it would almost be a vegan's delight if not for the use of shrimp paste. It's meant to be a mild curry because you often eat it with a side serve of spicy, heady rendang/prawn sambal/sambal goreng - by the time you're halfway through the meal, the gravy from these curries will seep into the coconut curry and flavour your lodeh. Additionally, most people eat lodeh with serunding - a spicy coconut floss. So you definitely want a mild lodeh gravy to complement the meal. 

That said, I LOVE lodeh. I am quite happy to drown my ketupat/lontong in lodeh and heap lots of veggies on my plate. In fact, I would happily eat this like a soup without rice, without accompaniments. I'd like to think that this is one of the rare ways I'm quite Malay - I am an absolute sucker for coconut milk based curries.

Mom's lodeh is significantly different from other lodehs - she calls her lodeh, Lodeh Kuah Putih, or White Lodeh. You see, most people add tumeric to their lodeh, which gives it a lovely yellowy hue. To be honest though, tumeric-tinged hue just isn't festive to me because it'll make your meal look like a bowl of lontong - which you can get for breakfast any day of the week. I know it's just a minor difference but I like my lodeh to be a bit special than normal lontong gravy. Heh!

Anyhoo, this is a super easy recipe. In terms of prep work, it's relatively simple in that you don't need to chop and blend a spice paste. Simply prep your veg and you're on your way. I was pretty stoked by how well my first batch of lodeh went.

Sorry, I don't have a photo of the batch I made. I was too hungry and only remembered to take a photo AFTER I'd gotten a second serve.


Lodeh Kuah Putih/ White Lodeh (A Work in Progress Recipe)

1 large spanish onion, sliced.
1 large green chilli, sliced at a diagonal
2 cloves of garlic, crushed
2 inches galangal, sliced and slightly crushed
2 stalks of lemongrass, tops cut off and bulbs crushed
2 Bay leaves
1 heaped tablespoons of pink belacan or fine shrimp paste (amount to be verified)
2 tablespoons of finely crushed dried prawns (amount to be verified)
1 can of coconut milk (amount to be verified)
Approx equivalent amount of water
Salt to taste (I didn't use any tho!)
1kg of your choice of "filling"

Filling options: 
  • Cabbage, sliced
  • Yam beans/bangkwang, peeled or cut into strips
  • Bamboo shoots, cut into strips or squares
  • Carrots, sliced at a diagonal
  • Snake/long beans, cut
  • Young nangka segments
  • Potato, cut into chunks 
  • Firm tofu, cut into squares or triangles and fried
  • Tempeh, cut into thick chunks and fried
Method
  1. Stir fry your onion, green chilli and garlic until soft. 
  2. Lower the heat and add water and coconut milk.
  3. Add your lemongrass, galangal, shrimp paste and crushed prawns. 
  4. Add your fillings and boil until tender.
Notes
  •  If you're in Singapore, you might want to use 2 onions - the onion I used was pretty huge. You essentially want about 1 and half to 2 cups worth of sliced onions.
  • You may also substitute onions with shallots.
  • I FORGOT the bay leaves when I first made this... and it still tasted pretty spot on.
  • Depending on what you choose as your filling, you might have to add each element at different stages of the cooking process so that you don't overcook/undercook anything.
  • Some recipes suggest using dried prawns and pounding in a mortar and pestle. However, I use powder fine, crushed dried prawns from my Asian supermarket. It just saves me the hassle of lugging out my giant mortar and pestle. It also incorporates itself into the gravy much easier. 
  • It is IMPERATIVE that you use pink belacan or shrimp paste instead of the usual dark belacan - using the latter will give you a very dark lodeh... which defeats the purpose! lol

Sunday, 29 June 2014

Masak Merah - Makcik Style

When Natt came to visit in April, I made it my mission to learn how make Ayam Masak Merah (literally, Chicken Cooked Red). Masak Merah is a popular member of the wedding banquet in Singapore and happens to be one of Natt's favourite dishes. She didn't get to have any at her wedding, so I thought I'd try my luck at making it myself.

It's a dark red, spicy tomato-based curry. Similar to a rendang, the gravy is usually reduced to a thick paste - although the extent of reduction varies from individual chefs.

I got this recipe from Julia's Recipe on Facebook. She's a fabulous cook and I can't help but marvel at how she is always in the kitchen... and how she makes it all seem so effortless. Unfortunately, Julia's style of cooking is what I refer to as Makcik-style. I've found that I had to make a few modifications in order to make the dish resemble the Masak Merah I love and that's what I've posted here. I've added notes at the bottom to detail what I changed, if you wanted to compare the two recipes.

Ayam Masak Merah

Ingredients:

1 Chicken – cut in parts washed & drained
2 teaspoons tumeric powder12 whole cloves
15 cardamom pods, lightly crushed to split the pod
3 cinnamon sticks
4 whole star anise
2 big onions – sliced
4 tomatoes – cut in quarters
1 cup tomato puree
4 tablespoons tomato sauce
2 tablespoons chilli sauce
1 can evaporated milk
1 cup of water
Salt & Sugar to taste
 

Blended Ingredients: 

4 big onions
6 dried chillies – soaked in hot water then drained
8 cloves garlic
2 inches ginger, sliced
6 stalk lemon grass, sliced
1 inch galangal, sliced


(The basis of any good Malay curry - the paste)

Method: 

  1. Coat the chicken evenly with a thin paste of salt and tumeric powder. Leave to marinate for 20 minutes. 
  2. In the meantime, blend the ingredients for the paste. You might need to add some water to get your blender going and get a nice smooth paste.
  3. Fry the chicken until golden.  

  4. In a wok, heat up the oil and fry the sliced onions until they have softened. 
  5. Once the onions have softened, add the star anise, cinnamon sticks, cardamom, cloves and blended ingredients. Fry until fragrant.
     
  6. Add the tomatoes, tomato sauce, chilli sauce, evaporated milk and water. Stir to combine.
  7. When the mixture is boiling, add the chicken and simmer until the gravy thickens. 
Notes:
  • I love lots of sauce. I've doubled the amount of sauce ingredients here so that each piece of chicken gets a healthy coverage of spicy, pasty, gravy.
  • However, I've kept the amount of evaporated milk the same as a single batch because I found that it made the gravy too light - whereas I am more used to Masak Merah which is as red as tomato puree.
  • I've said to use onions in this recipe - I prefer to use shallots as they are closer in taste to the red onions you get in Singapore than the Spanish onions in Australia.
  • I've added a lot more spices to my version than asked for in the original recipe to add more complexity to the dish. I found that the original amounts simply couldn't match up to the overpowering tomato paste. 
  • Best eaten the morning after cooking once all the flavours have seeped into and infused the chicken.

Thursday, 19 June 2014

Acar Buah (Spicy Fruit Chutney)

When I first started cooking properly (ie, I was responsible for a whole dish as opposed to just prep work), I mainly started with angmoh recipes and salads. I'd say that salads are my forte, with my sweet potato salad being one of my signature dishes.

However, as I started to get my groove in the kitchen, I started yearning for dishes from home. The only problem with dishes from home is that you often have to rely on your relatives for the recipe. And to be completely honest, makciks* really are among the worst people to ask for a recipe. Even with the convenience of the internet and online recipes, it can be hard to get hold of a good recipe

I had an overwhelming craving for acar buah so I decided to trawl the internet to compare recipes and combine and modify them as I saw fit. So bear in mind that this recipe a work in progress and that I might tweak it at some stage. However, this rough recipe should give you a good result. 


But what is acar buah?

Acar Buah, literally, means fruit pickle/chutney. To be honest though, this isn't the most accurate description of this dish. Acar buah is indeed a chutney but what makes it unique is that it is made of PRESERVED/DRIED fruit.

Preserved fruits are popular snacks in Singapore and Malaysia. This page shows just a small variety of what you can get in Singapore. You can get all sorts of preserved fruits in Singapore from plums, prunes, nutmeg fruit, mangoes.. and even some obscure fruit which even I never knew existed. But beyond that, there isn't just variety in the types of fruit that are preserved... but the way they are preserved. Plums/prunes (which are generally the most prevalent type of preserved/dried fruit) can be super sweet, super sour or a mix of sweet and salty.

The great thing about this recipe is that you don't have to wait for a season to make it because dried fruit is available all year round. A long shelf life means that if you accidentally buy too much, it's easy to store dried fruit if you can't finish off the whole bag. Heh.

Traditionally, acar buah was served as an accompaniment to rice and curry. That said, whenever acar buah was available, I think I'd end up eating more of it than the curry!

Acar Buah (A Work In Progress Recipe)

Spice paste:
500g shallots
10g dried chillis (rehydrated in hot water and drained)
10 cloves garlic
10cm ginger

Other: 
3 tablespoons fish curry powder (dry fried beforehand over low heat until fragrant)
1/2 cup oil
3/4 cup vinegar
1 cup caster sugar
1 cinnamon quill
8 cloves
2 star anise
700g mixed dried/preserved fruit

Some suggestions:
Raisins, prunes, plums apricots, pickled mango, orange peel, dates, cocktail onions, preserved nutmeg, limau jeruk (pickled limes). Most Asian supermarkets will have a range of pickled/preserved fruit but the range differs from store to store. The most common fruits you will get: orange peel, sour plums, pickled mango. 

Method:
  1. Blend the ingredients for the spice paste. If you prefer more texture in your chutney, you can blend some of the shallots but slice the rest.
  2. Heat oil in a wok and fry the blended ingredients (and shallot chunks/slices) and the curry powder until the mix is fragrant and oil rises to the surface. 
  3. Add the cinnamon, cloves and star anise. Simmer for a few minutes.
  4. Add sugar and vinegar until the mix reaches an even balance of sour and sweet. Simmer to allow the ingredients to be fully mixed in. 
  5. Add all the mixed fruits in and mix well. Simmer for 15 minutes. 
  6. Cool the mixture before transferring into an airtight container.
  7. Store in the fridge.

Extra Notes:
  • I've reduced the amounts here. The original recipe calls for 100g of dried chilli (!!!!!), 500g sugar (!!!!!) and a small bottle of vinegar (ahhh, Malay agak agak instructions at its best)
  • On that note, I have to stress that the measurements for the vinegar and sugar are ESTIMATES. Depending on what mix of fruits you use, you might need to vary the amount of sugar and vinegar you use. So add the two ingredients to your mix gradually, until you get an even balance of sour and sweet.  
  • The original recipe did not feature the dry spices. However, I did notice it in some other recipes during my research. I've added it here to give the chutney a more complex taste... plus I'm a sucker for the classic star anise, clove and cinnamon combination. 
  • Another recipe suggested using mustard seeds - however, I don't have any in my pantry plus I was worried it might make it a bit too savoury for my liking. 
  • The original recipe also suggested adding toasted sesame seeds as a garnish when serving - I'm not the biggest fan of sesame seeds and I've never had acar buah with sesame seeds, so I omitted it. 
  • The original recipe featured limau jeruk (pickled limes) as an ingredient. As I couldn't find any, I omitted it.  That said, seeing how I had a few kalamansis to spare, I decided to make my own limau jeruk to use for next time. And by next time, I mean, in a month or so, because apparently that's how long it takes to pickle limes. 
*This is the first in what I hope will be a series of "Makcik-Style" posts. Why do I call it makcik-style?

For those uninitiated with Singaporean/Malaysian culture, a makcik refers to a middle-aged Malay woman. The Malay style of cooking is very unprecise and involves a lot of "agak-agak" - agak meaning "guess/estimate" in Malay.

Not many of these makciks refer to recipes; instead, they use their senses when they're in the kitchen. Consequently, sometimes when I try learning recipes from my mother, I spend half my time fuming in frustration because she'll say "just put enough chilli", "if you want it sweeter, add more sugar, if not, don't add so much" and other similarly beginner-unfriendly comments. She doesn't mean it maliciously, of course - it's just very hard to learn when you don't have a basic understanding of the recipe/methods/process to begin with. 

It's not her or her contemporaries' fault because they were brought up to cook intuitively. Many makciks grew up watching their mums prepare said recipes. So when they first embark on trying a recipe on their own for the first time, they already have a vague idea of how to make it. I, on the other hand, wasn't particularly interested in cooking as a child, I wasn't expected to help out in the kitchen every day and my mum hardly made dishes which required too much prep work.

Unfortunately, as much as I despise learning via agak-agak, I am guilty of cooking this way as well, randomly adding ingredients as I see fit. I've tried modifying these recipes to reflect the quantities that I've used and the additions I've made.

Wednesday, 11 June 2014

A Mouthful of Ants' Nest...

This might sound a little strange but moving out of our condo, into a HDB neighbourhood was quite exciting for me. Surprise, surprise, the the biggest perk for me was how we suddenly had so many choices at our doorstep when it came to groceries and food.

We used to live in Normanton Park - which started as a private estate for army officers before it was open for public sale. We had our own cafe, bookshop, kindergarten and family-run supermarket... but that was it. To top it off, it was a rather isolated estate - it was set at the top of a hill, along the Ayer Rajah expressway - the nearest supermarkets/hawker centres were a drive away.

So to relocate to a neighbourhood where I could WALK to a major supermarket and have access to all manner of food stalls and shops... was exciting. So much to see, so much to choose from... 

I am digressing... back to what I was getting at.

One of our early discoveries was this little Chinese bakery named (strangely enough) Nagoya. I love Chinese bakeries in Singapore. I love custard tarts, the weird fluffy, rainbow-coloured bread (perfect for ice cream sandwiches!) and also the made-to-order waffles with the filling of your choice. I also loved the savoury buns - my favourite were tuna buns and those sausage buns with the weird, panko-like texture.

Nagoya was where I discovered honey cake. And boy, did I love it. I loved the sweetness (not from honey, mind you) and the spongy/bouncy/almost-rubbery texture of this cake. Over the years, I'd come to discover that this cake was also called "Kuih Sarang Semut" - ant's nest cake. It was called Sarang Semut because a GOOD cake is one which had a cross-section which looked like the inside of an ant's nest.

I've tried making this cake before... twice actually... and both times they were dismal failures. Both of them had issues with texture while the second try was a frustrated attempt after I messed up the sugar component of the cake.

So I was a little bit hesitant to try this recipe when I first came across it. Saudade got the better of me though, so I decided to give it a whirl.

Kenneth's got two recipes - one with sugar and one with golden syrup. Even though I have a terrible track record with making caramel, I thought I would stay true to the recipe and go ahead with the sugar variation. So that's the recipe I'm sharing here... as usual... with my notes! :)

I'm so glad I gave this recipe a try... it's the first time I managed to attain the near-perfect texture!


Kuih Sarang Semut

Ingredients:

180g butter, at room temperature
1 can of condensed milk, approx 380g
2 cups of self raising flour
2 cups of caster sugar
2 cups of water
1 and a half teaspoons of baking soda
8 eggs

Method:

  1.  Preheat the oven at 160 Celsius (140 Celsius, fan forced)
  2. In a high-walled saucepan, heat the sugar over low-medium heat, stirring continuous. Keep stirring until all the sugar is melted. This is a very delicate process. If you're worried, err on the side of lower heat so that you don't burn your sugar.
  3. Once the sugar reaches a light/golden brown, take it off the heat. 
  4. Carefully and gradually add water to the sugar syrup - the super hot sugar mix might spit when it comes in contact with water. If you find the sugar hardening, simply put it back on the low heat and stir the mixture until the sugar dissolves. You should end up with a golden-brown liquid, similar to maple syrup. Put the sugar syrup aside to cool. 
  5. In a mixing bowl, cream the butter.
  6. Add condensed milk and beat until well combined. 
  7. Put your mixer on a slow speed and add your eggs, one at a time. Mix well. 
  8. Switch your mixer off. Sift your flour into the bowl then mix until well combined. 
  9. While the blender is running, slowly incorporate the sugar syrup until well combined. 
  10. Add the baking powder
  11. Transfer the mix into a baking tin and bake for 45-60 minutes or until an inserted skewer comes out clean. 
  12. Let the cake cool, then slice and eat!

Extra Notes: 
  • I used a silicon baking tray, so there was no need to grease it. 
  • I found the sugar work to be the most challenging process. It took a long time to melt to melt and the mixture tended to clump up. Be patient and work through it slowly, the clumps will disappear.
  • In relation to the above, I actually used a lower flame so that I could have more control of the sugar. In some instances, I would increase the heat to get it going quicker but then take it off the stove and stir the sugar in over an unheated hob before putting it back on the heat.
  • You might have to use warm water - I used cold-ish tap water and found that the sugar would harden. Putting the heat on helped but it might be better to put in warm or hot water so that you don't have to spend time melting it all down.
  • If you want to cool the syrup down quicker, transfer it from the saucepan into a bowl. The saucepan's retained heat doesn't help with the cooling down process.
  • You really need to make sure the butter is very well incorporated and that you have a smooth batter. I noticed that despite all the mixing, I had little clumps of butter. I put them in the tray anyway, thinking they'll melt into the batter but I noticed little splotches of lighter cake in the batter. I might try melting the butter next time before using it.
  • This is quite a big recipe - I managed to get one 9 inch (I think) circle tray and a loaf of honeycake. That said, my nine inch tray is quite shallow, I might need to try using a higher tray next time.In the meantime, I've got lots of honey cake to get through and hubby will be bringing some to work tomorrow!

Sunday, 1 June 2014

Double Chocolate Banana Bread

We hardly have overripe bananas in the house because I LOVE super-ripe bananas. See the bananas below? That, to me, is the perfect state for consumption. It's when all the sugar has replaced the starch and it's the closest I'll get to the little sweet bananas (and minimally starchy) we get in Singapore. Most people think that these bananas are only good for baking or smoothies... but I'm happy to scarf this down as is.


Lately though, I've been a bit of a banana fiend and been buying more bananas than we could possibly eat.

So I've taken to baking banana bread, if I have the time. I'm still trying to look for awesome banana bread recipes but none of them have been spot on perfect, yet.
I did accidentally come across this recipe from Smitten Kitchen, so I decided to try it out.

I couldn't find any chocolate chips in the house... so...I kinda had to make do.

Mmm... Tobleroney goodness. 


Ingredients: 

3 medium-to-large very ripe bananas
1/2 cup (115 grams) butter, melted
3/4 cup (145 grams) light brown sugar*
1 large egg
1 teaspoon pure vanilla extract
1 teaspoon baking soda
1/4 teaspoon table salt
1 cup (125 grams) all-purpose flour
1/2 cup Dutch-process cocoa powder
1 cup (about 6 ounces or 170 grams) semisweet or bittersweet chocolate chunks or chips

*Smitten Kitchen says that you can use either dark brown or light brown sugar. She used dark but I chose to use light. I normally love dark brown sugar but I was worried it'd be a bit too rich in this instance. I might try it next time.

The original recipe has cinnamon powder in it but I chose to admit it because I was already adding salted caramel almond toblerone to my mix. Also, I wasn't sure I would have liked the cinnamon mixed with chocolate and banana. 

Method: 
  1. Heat your oven to 350°F/180 Celsius. 
  2. Butter a 9×5-inch loaf pan, or spray it with a nonstick baking spray.
  3. Mash bananas in the bottom of a large bowl. (You’ll have a little over 1 cup mashed banana total.) 
  4. Whisk in melted butter, then brown sugar, egg, and vanilla. Place baking soda, salt, cinnamon (if using), flour and cocoa powder in a sifter or fine-mesh strainer and sift over wet ingredients. 
  5. Stir dry and wet ingredients with a spoon until just combined. Stir in chocolate chunks or chips
  6. Pour into prepared pan and bake 55 to 65 minutes, until a tester or toothpick inserted into the center of the cake comes out batter-free. 
  7. Cool in pan for 10 to 15 minutes, then run a knife around the edge and invert it out onto a cooling rack. Serve warm or at room temperature. 
I think it turned out pretty well... judging by the hubby's expression!

The final cake is not as dense as a traditional banana bread - it's more like a cross between a cake and a brownie. Not that it matters, I've already been told that I can keep making more. Heh.

Tuesday, 20 May 2014

Peanut Pancakes

When I was just a little girl...

My dad used to bring me along on his weekend shopping expeditions at the Tanglin Halt wet markets. I really enjoyed our little trips. Even back then, I just loved the markets. I'd look at all the fruit and veg and con my dad to buy me anything which caught my eye.

I was always amazed by the traditional Indian spice ladies, who would scoop out curry powder from these giant, vibrant mounds of fresh powders.

And at the end of it all, my dad would bring us to the nearby hawker centre (not in Tanglin Halt but the other one a short walk away... Margaret Drive?) where he'd have a quick tea while he'd chat with the stall holders and I would have my single GIANT sugee cookie which would be about the same size of the plastic saucer it was served in.

Those weekend mornings were magical times for me.

Saturday, 17 May 2014

Gingerbread Skulls, Día de Muertos style

I had a massive craving for Gingerbread cookies the other day... ok I kinda lie... I was also dying to use my new Fred & Friends Sweet Spirits Cookie cutters.


Pretty cool huh? I tried making Gingerdead Men but the stamp didn't work as well as  the Sweet Spirits one, probably because the stamp side of the cutter was not as sharp or precise on the Gingerdead Men stamp. Bummer.

Anyhoo, for those of you who were interested, here's the recipe I used.